Good solder joints provide a strong and reliable means of connecting electronic components electrically and mechanically within the circuitry. The quality of a solder joint depends on factors such as the soldering iron, surface cleanliness, and technique used.
Adhering to good soldering practices ensures reliable and stable connections while preserving the original characteristics of the components.
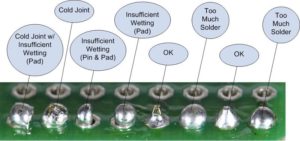
Good and bad solder connections Image: adafruit
Soldering iron
An iron of about 25W is adequate for most standard soldering jobs. It is important to use the grounded 3-pin power-plugged soldering iron to avoid damaging the sensitive components with stray charges.
The size of the tip depends on the size of the component lead and the spacing between the tracks.
The high-quality irons such as the soldering stations have adjustable temperature controls and various tip sizes, making them suitable for a variety of components and circuits.
Accessories for soldering
- Stand
- Damp sponge.
- Solder wick and solder sucker.
- Fine sandpaper or steel wool
- Crocodile clip
- Diagonal cutters
- Vise
Solder type and size
There are various kinds of solders, differing in diameter, metal content, and type of flux. For most PCB jobs, the rosin core solder 60/40, an alloy of 60% tin and 40% lead, or the newer lead-free rosin core solder are recommended. However, the lead-free solders have higher melting points than the lead-based.
The lead-based solder is being phased out in favor of the lead-free due to the toxic nature of lead. In fact, new products containing lead are banned in some countries such as Europe and those under the European Union (EU) region.
Recommended diameters range between 0.75mm and 1.00mm. Thicker solders are used to make larger joints faster but are not suited for smaller joints because of the likelihood to create bridges between the closely spaced pad and pins.
The rosin core acts as a flux and prevents oxidation of the metals in addition to enhancing the wetting of the surfaces.
Mixing the lead-free and lead-based solders cause cross-contamination which can lead to cracking of the joint, circuit instability, and sometimes non-compliant equipment. If using the same iron, use a separate tip for each type, or thoroughly clean the tip before using the other solder.
The soldering process for good solder joints
Cleanliness ensures good solder joints
For effective solder adherence, all surfaces and components lead must be clean and free of oil, grease, dust, and other contaminants.
Buy the Thermaltronics TMT-TC-2 Tip Tinner (20g) in 0.8oz Container (Amazon)
Start with the smallest and flat components such as signal diodes and resistors, followed by larger parts such as capacitors. The sensitive components such as ICs are soldered last to avoid damage.
Applying Solder
- Allow the soldering iron to heat and then clean its tip using the moist sponge.
- Tin the tip by applying the solder and ensure it covers the entire tip. This aids the heat to flow from the tip to the connection being soldered. A well-tinned tip should appear shiny silver. Wipeout any excess solder with the damp sponge.
- Heat both the solder pad and the component’s lead for a few seconds.
- Touch the end of the solder wire to the hot connection and let it touch both the pad and the lead.
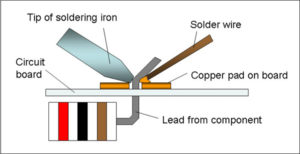
Applying the solder image:aaroncake
- The solder will melt and flow into and around the heated joint. The flux will melt with the solder and bubble around the joint, a part of the cleaning process. The flux then flows out while releasing some smoke.
- Add enough solder to cover the joint till a small mound of solder with slightly concave sides from around the component lead or pin.
- Remove the solder, then the iron and wait for the joint to cool for a few seconds.
- Inspect the connection, once satisfied; trim the lead by cutting part above the solder. Clean the excess flux residue – some of the fluxes can absorb water and become conductive.
Ideal solder joint Image: adafruit
Soldering Surface-mounted components
Place the iron tip of the solder pad. When the joint is hot, apply just enough solder to flow around and cover the component lead, make sure it makes a good joint.
Remove the solder but keep the heat for the solder to wick up between the lead and the pad, remove the soldering iron and allow the connection to cool undisturbed. A good joint has smooth, concave fillets.
An ideal Good SMD solder joint – image: poeth
Precautions when soldering
- Be careful of the high temperatures,
- Avoid breathing in the fumes from the flux.
- The rosin flux and lead are hazardous and you should always wash your hands after soldering.